White Chocolate Oreo Bark: The 10-Minute Dessert That Breaks the Internet (and Your Willpower)
Here’s the deal: you don’t need a pastry degree, a stand mixer, or patience to make something wildly addictive. White Chocolate Oreo Bark is the snack you “just have a bite of” and then mysteriously half the pan disappears. It’s crunchy, creamy, dramatic, and dangerously easy.
We’re talking five ingredients, no baking, and a guaranteed applause break when you crack it. Want a dessert that looks like it took effort but didn’t? This is the flex.
Why This Recipe Works
- Texture contrast: Snappy white chocolate and chunky Oreo pieces give you that perfect crunch-to-cream ratio.
- Low effort, high reward: No oven, no stress.
Melt, mix, spread, chill. That’s the entire playbook.
- Flavor balance: Sweet white chocolate meets the slightly salty, cocoa-heavy bite of Oreos—no extra sugar required.
- Scales like a dream: Double it for a party tray or halve it for a “movie night for two.” (LOL, good luck stopping.)
Ingredients Breakdown
- 16 oz (450 g) high-quality white chocolate, chopped or use wafers. Real cocoa butter melts smoother and sets better.
- 18–20 Oreo cookies, roughly chopped.
Go classic or mix varieties for chaos.
- 1 tsp neutral oil or cocoa butter (optional) to improve melt and shine.
- 1/2 tsp vanilla extract (optional) for rounder flavor.
- Pinch of fine sea salt to cut sweetness and make flavors pop.
Let’s Get Cooking – Instructions
- Prep your pan: Line a baking sheet (9×13 or similar) with parchment. Leave overhang for easy lift-out.
- Crush the Oreos: Rough chop or smash in a bag. Keep some larger chunks for drama and some crumbs for texture.
- Melt the white chocolate: Microwave in 20–30 second bursts, stirring between each, until smooth.
Or use a double boiler over low heat. Stir in the oil/cocoa butter if using.
- Flavor boost: Stir in vanilla and the pinch of salt. Taste a little.
Smile.
- Fold in the Oreos: Reserve a handful for topping; mix the rest into the chocolate quickly but gently to keep chunks intact.
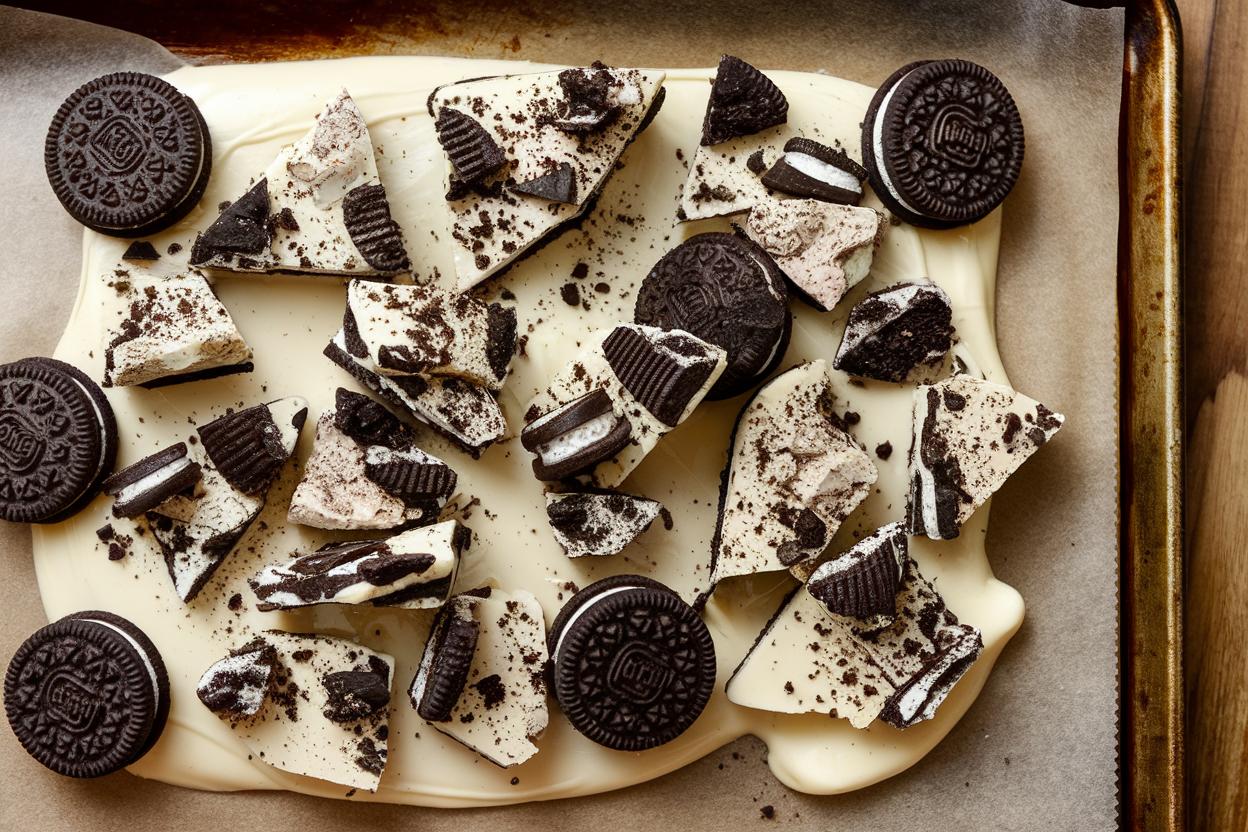
- Spread it out: Pour onto the lined sheet and smooth to about 1/4 inch thickness. Don’t overwork it—this is bark, not tile grout.
- Top like you mean it: Sprinkle the reserved Oreo pieces (and crumbs) over the surface. Lightly press so they adhere.
- Set it: Chill in the fridge 20–30 minutes until firm, or let set at cool room temp for about 60 minutes.
- Break and serve: Lift the slab, crack into shards with your hands or a chef’s knife.
Aim for irregular shapes—rustic is the brand.
Preservation Guide
- Room temp: Store in an airtight container up to 1 week in a cool, dry spot. Best texture, IMO.
- Fridge: Up to 2 weeks. Keep sealed to prevent moisture or fridge odors from crashing the party.
- Freezer: Up to 2 months.
Wrap tightly to avoid bloom. Thaw at room temp in the container to reduce condensation.
- Layering tip: Use parchment between layers to prevent sticking and heartbreak.
Nutritional Perks
- Portion control: Breakable shards let you choose your destiny—tiny nibble or boss-level slab.
- Energy boost: Quick carbs for a fast pick-me-up. Great pre-hike treat, questionable pre-Zoom choice.
- Customizable: Add nuts or seeds for a bit of fiber and healthy fats.
Small upgrades, big win.
Don’t Make These Errors
- Using compound coating only: Cheap white “candy” can taste waxy and won’t set as cleanly. Real white chocolate = cocoa butter on the label.
- Overheating the chocolate: It seizes or burns fast. Short bursts, constant stirring.
If it thickens, a teaspoon of oil can rescue the texture.
- Wet utensils: Even a drop of water can seize melted chocolate. Dry bowls and spatulas only, FYI.
- Too many mix-ins: More than a 1:1 ratio of Oreos to chocolate leads to crumbly bark that won’t hold.
Alternatives
- Swirl effect: Spread melted white chocolate, then drizzle melted dark chocolate and swirl with a skewer. Add Oreos on top.
- Flavor twists: Peppermint extract + crushed candy canes; orange zest + pistachios; freeze-dried raspberries for tart pop.
- Mix-in swap: Try Golden Oreos, gluten-free sandwich cookies, or chocolate wafer cookies.
- Textural upgrades: Add toasted almonds, mini pretzels, or a sprinkle of flaky salt for restaurant-level vibes.
FAQ
Do I need to temper the white chocolate?
Not required for casual bark.
If you want a glossy, snappier finish that holds at warmer temps, tempering is ideal. Otherwise, chilling sets it just fine.
Why did my chocolate seize?
Water or steam likely hit the chocolate, or it overheated. Melt slowly, keep everything dry, and add a teaspoon of neutral oil to loosen if it thickens.
Can I make this dairy-free?
Yes—use dairy-free white chocolate and a vegan sandwich cookie.
Many brands exist now with coconut or rice-based white chocolate.
How thick should the bark be?
About 1/4 inch is the sweet spot. Too thin and it shatters; too thick and it eats like a brick. Aim for even coverage on the tray.
How do I gift it without it melting?
Package in airtight bags or tins with parchment and keep it cool.
For warm climates, include an ice pack and deliver quickly. Tempered chocolate holds up better.
Wrapping Up
White Chocolate Oreo Bark is the dessert hack that feels illegal: minimal effort, maximum wow. It’s customizable, scales easily, and disappears faster than you can say “just one piece.” Keep the ingredients on standby and you’ve got a party trick for life.
Ready to break some hearts—and some bark?