Ice Cream Cone Cupcakes: The Dessert Mashup That’ll Make You the Coolest Person at Any Party
Okay, real talk—ice cream cone cupcakes are what happens when cupcakes dress up as ice cream cones for Halloween. They look like a scoop of ice cream perched on a cone, but SURPRISE—it’s actually cake. And frosting. And joy.
Kids love them. Adults love them. You will love them—especially once you realize how ridiculously fun (and kinda chaotic) they are to make.
And yes, they’re slightly over-the-top. But come on… look at them. They’re cupcakes in cones. This isn’t just dessert. This is entertainment.
So… What Are Ice Cream Cone Cupcakes?
Imagine this:
- A crisp wafer-style ice cream cone
- Filled with cake batter and baked
- Topped with swirly frosting to look like a scoop of ice cream
- Dressed up with sprinkles, chocolate drizzle, cherries… you name it
They’re perfect for:
- Birthdays
- Summer BBQs
- Impressing people at potlucks
- Random Tuesdays when you just need a win
And let’s be honest—any dessert that makes you smile before you even bite it? That’s a keeper.
What You’ll Need (and It’s Not That Complicated, Promise)
For the cupcakes:
- 12 flat-bottom wafer-style ice cream cones
- 1 box of cake mix (or your favorite homemade recipe)
- Eggs, oil, water (whatever the mix calls for)
For the “ice cream” topping:
- 1 batch of buttercream or whipped frosting
- Optional: food coloring to match your favorite “flavors”
- Sprinkles, mini chocolate chips, crushed nuts, or cherries for toppings
- Chocolate sauce or melted candy melts for “drizzle” effect
Pro tip: Get a muffin tin and some aluminum foil ready. You’ll need it to keep those cones from toppling over like tiny dessert towers of Pisa.
How to Make Them Without Losing Your Mind
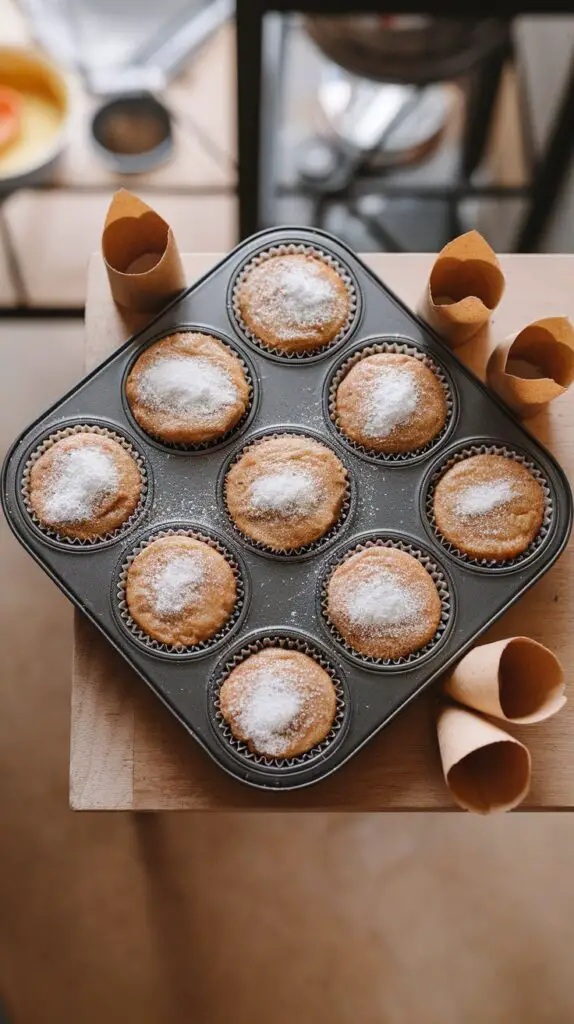
1. Preheat the Oven & Prep the Cones
Heat your oven according to your cake mix instructions.
Grab a muffin tin and tear off small squares of foil. Wrap a square around each cone base and gently press it into the muffin wells to keep them standing upright.
This step = life-saving stability. No cone-casualties on your watch.
2. Fill with Cake Batter
Spoon batter into each cone, filling it about 2/3 full. Don’t overdo it unless you want frosting and cake volcanoes.
3. Bake
Bake according to the box instructions—same time as regular cupcakes. Keep an eye on them around the 15–18 minute mark.
They’re done when a toothpick comes out clean and the tops bounce back.
FYI: Some cones might crack. That’s okay. Just call them rustic.
4. Cool Completely
Let them cool fully before frosting, or the heat will melt your beautiful topping dreams into a sad puddle.
5. Frost Like Ice Cream
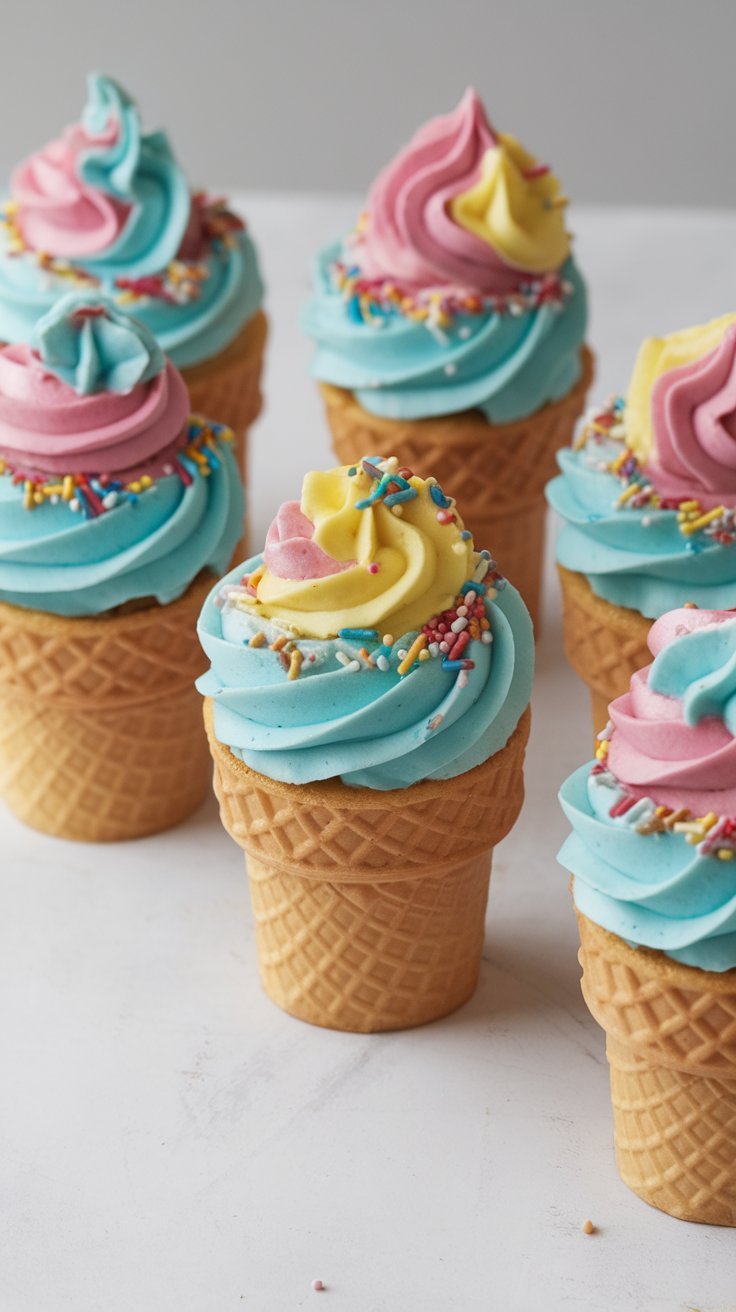
Pile frosting on top like a scoop of soft-serve. Use a piping bag for precision or go rustic with a spoon. Swirl it, dome it, or stack it sky-high.
Bonus points if you color the frosting to match real ice cream: pink for strawberry, brown for chocolate, pastel green for mint chip. 👌
6. Add All the Toppings
Sprinkles? Yes. Chocolate drizzle? Heck yes. Maraschino cherry on top? Now we’re talking.
Go wild. This is your moment.
Tips for Not Screwing It Up
- Don’t overfill the cones with batter. Seriously. Overflowing = hot cake lava.
- Use flat-bottomed cones—the ones that stand. Those pointy sugar cones? Cute but a logistical nightmare.
- Store them upright in a deep baking dish or tall container to keep them safe from frosting faceplants.
- Frost right before serving if possible, especially if it’s hot out. That buttercream can only handle so much drama.
Fun Variations (Because Why Stop at One Style?)
- Neapolitan: Layer chocolate, vanilla, and strawberry batter for triple flavor madness.
- Birthday Cake Cones: Use funfetti cake and rainbow sprinkles galore.
- S’mores Cones: Add mini chocolate chips and marshmallows into the batter. Top with a toasted marshmallow instead of frosting for peak chaos.
- Mint Chocolate Chip: Green frosting + mini chips = visual trickery and delicious confusion.
FAQ: Let’s Clear the Cone-fusion
Q: Can I make these ahead of time?
Yes! Bake them up to 2 days in advance, but frost them closer to serving for max wow-factor. Store in an airtight container, upright, and away from humidity (cones hate soggy situations).
Q: Do I have to use a box mix?
Nope! Go homemade if you want to. But when you’re already wrestling cones and frosting, no shame in using the shortcut.
Q: Can I freeze them?
Meh. You can freeze the baked (unfrosted) cupcakes, but the cones might get weird and chewy. These are best served fresh-ish.
Q: How do I transport these without ruining everything?
Use a deep baking dish or a tray lined with foil. Stick each cone in a hole or muffin liner so they don’t slide. Drive carefully like you’re transporting literal gold.
Q: Can I use whipped cream instead of frosting?
Sure, but know that whipped cream melts fast—especially in warm rooms or under Instagram lighting. If you’re going that route, serve ASAP.
Final Thoughts: Chaos, Cake, and Cone Joy
Ice cream cone cupcakes are part dessert, part optical illusion, and 100% fun.
They might not be the neatest dessert you’ve ever made (spoiler: they won’t be), but they’re:
- Memorable
- Ridiculously cute
- Perfect for parties, birthdays, or just showing off
Plus, they taste amazing. Cake, frosting, and cones? Hello, trifecta.
And even if one topples or your frosting looks more “blob” than “soft-serve swirl,” guess what? Still delicious.
So go ahead. Bake the cones. Frost them like you mean it. And when someone says, “Wait… that’s not ice cream?!”—just smile like the dessert genius you are. 😏